Showing posts with label paper piecing. Show all posts

Saturday, December 18, 2021

A Tall Thanks - Polka Dot Orchard

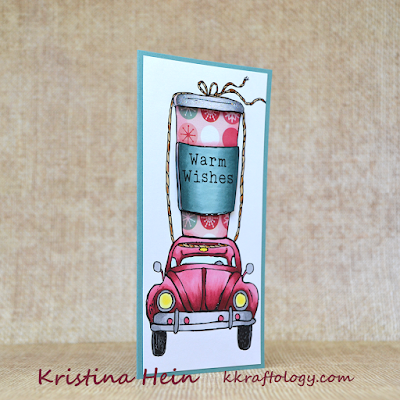
 Happy Saturday!  Hello and welcome!  I should totally be wrapping Christmas presents right now but I'm here sharing my latest card instead...  I recently fell in love with the A Tall Thanks digital stamp set from Polka Dot Orchard.  So, it hopped into my cart and here I am with a card!


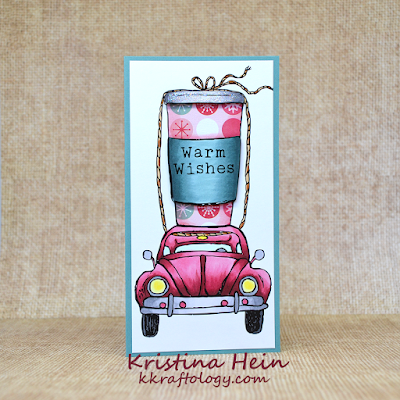
I printed the image onto Neenah Solar White cardstock.  I also printed it out onto a fun holiday patterned paper.  I fussy cut the cup from the patterned paper.  Then I cut the sleeve and the lid out of the Neenah cardstock.  I colored up the sleeve with Copics BG78, 75 and 72.  I added some shading to the patterned paper with R85 and 83.  I used N5, 3, 1 and 0 to the lid. 

Next I added foam tape to the back of the sleeve and the lid and applied them to the cup.  I got out my Star Dust Stickles and added it to the lid.  I set the cup aside to dry.

I had a another complete image on cardstock.  I cut it down to 3" x 6" and colored it with more Copic markers.  I did put down a light layer of color on the cup in case anything showed around my fussy cut pieces.  The car is colored with R89, 85 and 83.  The grays I used were N7, 5, 3 and 1.  I used E39 & 36 to add color to the rope.  For the headlights I used Y02 and 00 and BG0000 for the glass areas.  

I glued the patterned paper cup onto the colored panel.  Then the whole thing went onto a 3 1/4" x 6 1/4" card base.  And that's a wrap!  You can check out the entire Polka Dot Store HERE.


Thanks for stopping by and have a fabulous day!
~Kristina
Compensated affliate links may be used - I may receive a small commission at no additional charge to you should you make a purchase using my link.
Teflon bone folder
Teflon bone folder
Shop at:
EH
Tombow Mono Multi Liquid glue
Shop at:
SBC | EH
Therm O Web Foam Tape
Shop at:
SBC | EH
Copic Marker BG75
Copic Marker BG75
Shop at:
EH
Copic Marker BG72
Copic Marker BG72
Shop at:
EH
Natural White Neenah cardstock
Shop at:
EH
Cutter Bee Scissors - EK Success
Shop at:
SBC
BG78 Copic Marker
BG78 Copic Marker
Shop at:
EH
Star Dust Stickles
Star Dust Stickles
Shop at:
EH

Thursday, January 23, 2020

PDO Technique Thursday

Howdy friends!  Today I've got a card AND a technique to share with you.  I am using the Beary Best Friend digital stamp set from Polka Dot Orchard.  You can find it HERE in the Polka Dot Orchard store.


The tecnique I'd like to focus on today is paper piecing.  You may not think about paper piecing with digital stamps but you totally can!  Let's take a peek at my finished card and then we'll dive on in.


And here we go!

I started by printing out the digital stamp on to all of the different papers I wanted to use in my card.


Next I cut out all of the parts and pieces I needed.


Then I used Copic markers to add a bit of depth and dimension to the pieces.  


I set the pieces aside to work on my base layer.  I'm excited to make my first slimline card!  I printed the same digital stamp onto the base white layer.  I created my own mask using copy paper and got to work creating my ink blended background.  I used Bundled Sage, Stormy Sky and Antique Linen Distress Oxide inks.


Once the blending was complete I removed the mask.  To add a bit more interest to the blended background, I splattered it with water and dabbed it up after 10 seconds or so.  I did also add some Copic marker detail to the bear.


Here is what it looked like after I used liquid glue to add the bits and pieces.  I also used foam tape for even more dimension on the fox's scarf and the cuffs and band of the bear's sweater.  Stay tuned for a side view.


I layered my finished panel onto a navy card base.  I also used one of the sentiments from the same stamp set.  I printed it onto white, layered it onto navy, layered again onto white and added foam tape to the back.  All finished!


And a side view to see the added dimension.


I really appreciate you stopping by and I hope you give paper piecing with digital stamps a try!

~Kristina

Supplies used:


Tombow Mono Multi Liquid glue
Shop at:
SBC | EH
Therm O Web Foam Tape
Shop at:
SBC | EH
Copic Marker R22
Copic Marker R22
Shop at:
EH
Bundled Sage - Distress Oxide
Shop at:
SBC | EH
Antique Linen - Distress Oxide
Shop at:
SBC | EH
Stormy Sky - Distress Oxide
Shop at:
SBC | EH
Copic Marker YG63
Copic Marker YG63
Shop at:
EH
Copic Marker R20
Copic Marker R20
Shop at:
EH
Copic Marker B95
Copic Marker B95
Shop at:
EH
Copic Marker W00
Copic Marker W00
Shop at:
EH
Copic Marker W0
Copic Marker W0
Shop at:
EH
Copic Marker W1
Copic Marker W1
Shop at:
EH
Copic Marker W3
Copic Marker W3
Shop at:
EH
Copic Marker W5
Copic Marker W5
Shop at:
EH
Copic Marker YR21
Copic Marker YR21
Shop at:
EH
Copic Marker YR23
Copic Marker YR23
Shop at:
EH
Copic Marker E13
Copic Marker E13
Shop at:
EH
Copic Marker E17
Copic Marker E17
Shop at:
EH
Copic Marker E18
Copic Marker E18
Shop at:
EH