Monday, May 29, 2017

All smiles

Happy three day weekend everyone!  I appreciate the fact that with an extra day off I can spend more time in the craft room!  I also figured this would be a really good time to type up today's quick blog post.  Last week I shared some images on Instagram of some work I am doing in the Copic Marker mega class from Mindy Baxter/My Creative Scoop. You can check out this awesome class here.  I am learning so many things including how to cover/go with your mistakes.  Like extra marker blobs or bleeding outside the lines...or dropping your marker on your work!  Mindy has given me the freedom to NOT throw away projects and I love it.

In the past, my Copic projects have been on Neenah Solar White.  Now I am a convert to Copic Xpress it and Cryogen white cardstock.  I still love my Neenah for many things but I was getting frustrated with the bleeding.  Sometimes I could control it and sometimes I couldn't.  To be honest, it could be user error but I am happy with the new papers I am using.  So if you are getting frustrated with your current paper, I suggest giving the two I have listed a try!  You might just love them.  On to my project!


The girl is a digital stamp included in the class and I printed her out onto the Cryogen white paper.  In the class, Mindy shows you how to color an ombre dress and I just had to try it out.  She had a different color scheme but I just found some colors I wanted to use and jumped right in.  I would list my colors used but I can't find my piece of paper with all of the colors.  Dang it!  I think my craft desk needs a little bit of cleaning.  If I find it I'll come back and add the information.  I know that they are from the V and BV color families.  I then used some of the same colors from the dress along with B000 and B0000 to create the little dots all over the background.

The purple gingham paper is from a Doodlebug paper pad, the dark gray cardstock is from MFT Stamps and the light gray is from Stampin Up.  I used a Tim Holtz stencil and Going Gray ink from Stampin Up to create the pattern on the gray cardstock.  I added an assortment of sparkling sequins from my stash and the sentiment is from a Mama Elephant set.  There you have it!

I highly encourage you to check out Mindy's Class.  I have learned lots and look forward to learning more.  My next section to work on is animal fur!  Have a fantastic day!

~Kristina

Wednesday, May 24, 2017

Zany zebra

Hi there!  We've made it to Wednesday which means we've got half of the week behind us already! Yay!  I'm here to help make the day even better by sharing my latest Craftin Desert Diva's project with you.

I'm sure you have learned by now that I'm not afraid to color my critters any color I choose.  I know they aren't naturally occuring but I just can't seem to help myself.  They practically beg me to color them in whatever zany combination I can come up with.  So today's project is no different.  I *really* intended to use black and white for this zebra but...well...you know.  A super happy, pink and gray Zebra!  I don't regret it one bit.

I actually had the current mood board/social media challenge picture up from Craftin Desert Diva's and I really wanted to use these awesome, bright colors.


Aren't they just super fun??  You've even got several days to enter the challenge.  Give yourself a treat and take time to color up a stamp or two and enter them in the challenge.  Don't forget to use #CDDMONTHLY!


I guess I should get to sharing my card with you,  Here it is!


The patterned paper piece on the left is something I created using a really cool stencil and 3 different colors of distress inks.  I inked the pink and the orange first.  Then I moved the stencil just a little and went over it very lightly with a gray distress ink.  I was attempting to give a bit of a shadow.  I'm not sure I totally succeeded but I still love it!

I used Copic markers to color in the Zebra Note digital stamp.  The sentiment comes from the Tiny Sentiments set and was a perfect fit!  I cut a scalloped circle out of watercolor paper using a die from the Stitched in Circles die set.  I used the same pink and orange distress inks to add the splatters to the watercolor paper as well as adding in some black.  I very lightly sponged around the edges with both the pink and gray distress inks to give it a little pop.The orange circle is also cut it with a die from the Stitched in Circles die set.  The orange paper is from the Gingham & Linen Doodlebug paper pad.

I adhered the zebra down with foam tape and layered up the circles.  I used a dark gray cardstock for the base.  The little pink stripe you can see in the center is also from the Gingham & Linen Doodlebug paper pad. I cut another strip of the gray cardstock and went over it with Wink of Stella to make it sparkle.  I then adhered the stenciled paper on top and added the circles.  I stood back and took a good look.  I decided it was missing something on the right side so I dug through my collection of sequins.  I pulled sequins from the Citrus Bliss mix and the Comet mix.  It seemed like the perfect finishing touch.

Thank you SO much for stopping by today.  I do hope you will go check out the challenge at the Craftin Desert Divas Gallery Facebook page!

Until next time!
~Kristina


Wednesday, May 17, 2017

Flying by

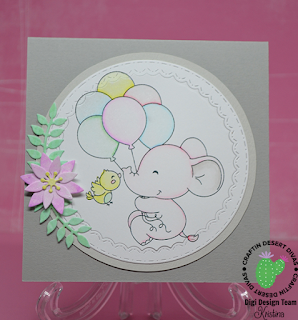
If you are like me, you are happy to have made it to the middle of week!  It's all down hill from here,right?  I find a little crafting always makes me stop and enjoy myself.  Even if it's only for 15 minutes!  Today I have brought back the adorable elephant from Happy Hello.  I did mention previously how much I love this little guy/gal!

I love using Zig Clean Color markers but I always seem to end up with really bright/deep colors. Sometimes that is exactly what I'm looking for but now and then I need something soft.  To that end, I have been practicing much softer coloring.  I think I managed to pull it off with today's card.


I really had to hold myself back and just lay down the barest hint of color.  Then I just used my waterbrush to pull the color out.  I'm certainly happy with the way it turned out!  I used the Inside Scalloped Circle die to cut the image out and add some detail.  I put it back together and adhered it to a light gray circle and glued it all to a gray card base.  The flowers are also from the Inside Scalloped Circle die set.  I cut them out of Bristol paper and used  a few of the Zig Clean Color markers to add color which I spread out with the waterbrush.  Easy peasy flowers that are a perfect match for my card!

This turned out to be a pretty quick card to complete.  I bet you could even make a set in assorted colors to give out as gifts!  I hope you take the time to check out these goodies at the Craftin Desert Divas store!

~Kristina


Wednesday, May 10, 2017

Many wishes

Welcome back to my blog!  Today I have a Craftin Desert Divas project to share with you. I'm using the May Mood Board/Social media colors as my inspiration for my card.  They are so bright and cheerful.  I can't help but smile when I use them!


We're really just at the beginning of May so you have LOTS of time to whip up a project to participate in the challenge.  Check out the CDD Gallery FB Group for further details.  Don't forget to use #cddmonthly!


Now I know peacocks don't really come in these colors but isn't it super fun?!  I created the background on watercolor paper using Kuretake Gansai watercolors.  After the colors splotches were dry, I splattered it with all the different colors from the splotches as well as adding gold and black. Once it was completely dry I cut it using one of the dies from Fancy Frames dies.  I hand cut a pink layer and a turquoise layer.  The green layer was cut out using another of the Fancy frame dies. Then I adhered all of that to a black layer and finally the white card base.  This card is heavy!

The word I cut out of black glitter paper using a die from Wishful Thoughts.  I also cut it out three more times using white paper.  I wanted it to stand out from the card but I don't have much luck using the fun foam with dies.  It always seems to end up a little bigger than the die...maybe because it gets squished?  Anywho, I glued all the layers together and adhered it to the card.  The oh so small wishes word comes from the Autumn Wishes set.  I just stamped the one word from a larger sentiment.  It happened to be the right size.  I stamped it in Versafine black and embossed it with clear embossing powder.

The two thin strips are two different shades of gray.  I used the same die from Fancy Frames so that the ends would match up perfectly and have the stitching detail.  Oh, I almost forgot to tell you that I colored the peacock using Copic markers.  I put a little bit of foam tape behind the parts of the peacock that weren't touching the gray strips.  That finishes up my project!  I do hope you like it!  It was a lot of fun to create.  I do love using my watercolors for backgrounds.

Hope to see you back soon!
~Kristina


Tuesday, May 9, 2017

Floral fun

I am really, REALLY excited to bring you today's post.  I signed up to take Mindy Baxter's Mother's Day coloring class.  This class is only available for purchase through May 14th but it is available for a lifetime after purchase!  It uses a gorgeous digital stamp (purchased separately) from Power Poppy.  I was thrilled to get to combine two things that I have wanted to do.  Take an in depth Copic class AND try out Power Poppy stamps.  A total win-win for me!

I cannot even begin to tell you how much fun I had taking this class.  It's like Mindy is right there in your home giving you one-on-one instructions!  She goes into a lot of detail and it's super easy to pause and catch up to whatever portion she is working on at that moment.  Not to mention you can "rewind" and watch things as many times as you need.  Awesome!  I felt her instructions were very clear and well thought out.  I mean, they must have been or there is no way I could have created such a gorgeous card!  Seriously!!  So without further delay, here is the result of taking Mindy's Mother's day class.


It is just so amazing!  I keep getting it out because I can't believe that I made that!  Yes, I am squealing here and doing a happy dance.  And it's even a no line coloring image!  And it looks fabulous!  Mindy made it so incredibly easy to create this gorgeous piece of art.  I can hardly bear to part with it but I think my Mother-in-law will be thrilled!

To create the card itself, I added just a little bit of extras.  I added a few sparkle flat sequins and a couple of clear Nuvo drops.  I used the same pink Copic marker to color the mat layer and went over it with a Spectrum Noir glitter marker because everything needs sparkle.  As the final step I adhered it all to a dark gray card base.  Done!  I couldn't bring myself to stamp a sentiment so I embossed one in silver on the inside.

If I haven't convinced you yet to run over and sign up for Mindy's class then I better share one more thing with you.  Mindy's classes aren't just for Copic markers.  You can certainly use any kind of alcohol markers.  I also wanted to show you how the same techniques she shows you can be applied using different mediums.  I brought out my Zig Clean Color markers and got busy!  Take a look.


Isn't it just as stunning as the one I did with Copics??  I am just tickled with how great this one turned out as well.  I encourage you to go check out Mindy's full line of classes which can be found right here.  I must also mention Mindy's awesome website My Creative Scoop.  She has so much to offer and a lot of it is free.  Yes, FREE!

These classes are going to become very addicting, I can just tell.  In fact, I'm off to continue working on her Create with Markers mega class.  I hope to be back soon with more lovely projects to share!

~Kristina

Wednesday, May 3, 2017

Elephant Hello

Hiya!  I do hope your May is off to a great start!  I'm here today to share a new project I created featuring goodies from Craftin Desert Divas.  There is a new monthly challenge over on the Craftin Desert Divas Gallery Facebook page but I still can't seem to get past last months lovely colors! They were just so darn soft and pretty.  So, you have been warned!


This elephant digi is just TOO cute for words!  I was so excited when Tara released it in the store.  I had to color it up right away using one of my favorite mediums...Zig Clean Color Real Brush markers. As per the usual, this was printed out on Bristol smooth paper.  I have yet to get my laser printer to cooperate with using heavy watercolor paper.  I like using the Zigs on regular watercolor paper as well.  Please share if you have any tips for laser printing on 140lb watercolor paper!

My card is so super simple but I think it lets the digi take front and center.  It's too cute not to make it the star!  I only used six markers and a waterbrush to blend all the colors out.  That's it.  Super duper easy.  I mounted it on a pink layer and then onto a taupe card base.  The Hello sentiment is from Simply Said stamped in black with touch of Wink of Stella on top.  I cut a small blue layer, added foam tape and adhered it to the card.  I called it done!  

Seriously, you should rush over to the store right now and get the Happy Hello digital stamp!  At .99 cents, CDD digis are an awesome value!

I'll be seeing you soon!
~Kristina

Monday, May 1, 2017

Pretty as a Princess

Happy May everyone!  I'm here today to share some news that is pretty darn exciting for me.  I have been chosen as one of the members of My Creative Scoop Creative team!!    You can see all of the fabulous members of the design team here.  I am SO jazzed!  I have always wanted to take one of Mindy's classes and now I am finally getting a chance.  I get to work on improving my coloring skills while sharing my progress with you all.

Another equally exciting piece of news is that Mindy is launching her very own line of digital stamps! Her store is launching today.  You are going to love her release.  Head on over right now! My Creative Scoop Digi shop.  To help with her launch I have a lovely card to share with you featuring her brand new Tiana digi stamp!  She is such a fun stamp to color.


Would you believe that this is my very first time using such a dark skin tone?  I've already picked up a few hints from Mindy's Create with Markers mega class.  You can check out all of her classes here.


I printed Tiana out onto Copic X-Press paper.  I generally use Neenah Solar White but Mindy highly recommends the X-Press It paper.  It worked out beautifully!  I colored everything using Copic markers.

Skin V17, E27, 25 & 23
Hair W9, E49, 47, 44
Dress and Crown YG0000, 00,03, 05, 07, 09, 21, W00
Flower RV13, RV11, G28, G24
Lips R56, 59

I do hope you take a peek at Mindy's Etsy store as well as all of her great classes!  Thanks for stopping by.

~Kristina