Monday, May 16, 2022

Translating inspiration with Scrappy Tails Crafts

Hiya!  I don't know about you but sometimes I get struck by inspiration when I'm not looking.  I have watched the movie Encanto at least three times lately.  It just makes me happy.  Then one night I couldn't sleep and my brain had an ah ha moment!  So, I set about translating the inspiration simmering in my brain into reality.


Are you excited yet??  Let's chat!

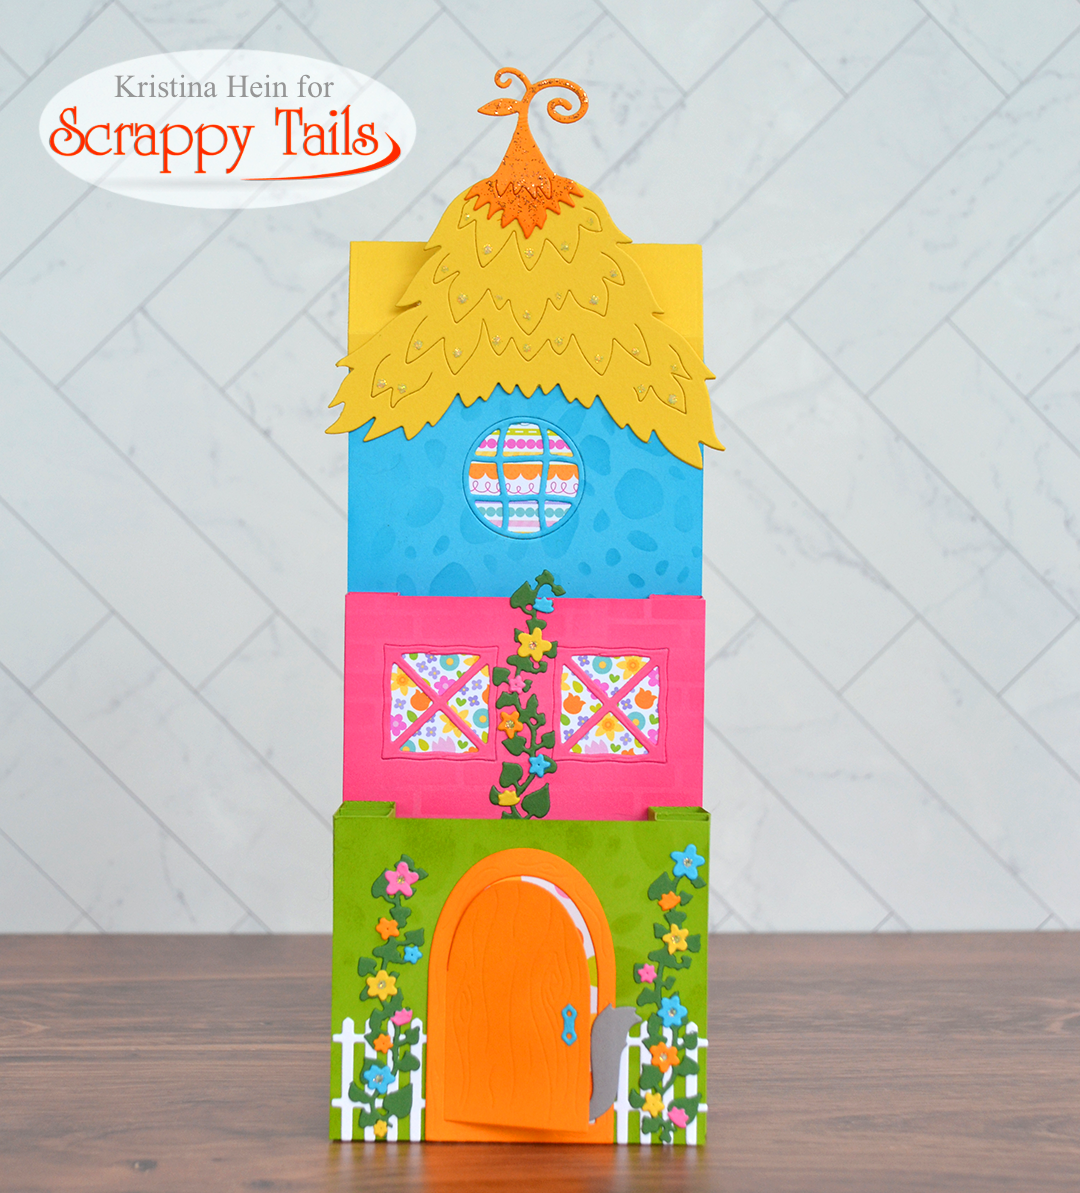
I was able to use elements from several different Scrappy Tails Crafts dies to bring this creation to life.  The most important set to start with is the Slimline Flower Stand Pop Up set.  I knew I wanted to have windows on two of the layers and a door on the bottom.  That meant I would need to make custom sized support posts for the middle and front layer.  


Once I knew the height I could cut the panels as well.  And then I had a pile of pieces!


I added stencil detail to the three main panels.  I cut two pieces of cardstock to use as stencils.  One was cut with the Slimline Brick Background die and one from the Slimline Cobblestone die.  I used the cobblestone stencil on the back panel and the front panel.  For the middle pink panel I used the brick stencil.


Now, to create my windows in the blue and pink panels I used the window dies from the Slimline Fairy House dies.  I glued pieces of paper from an older Doodlebug paper pad called Simply Spring.  Then I glued the window pieces back into the openings.

Let's start building!  I used liquid glue to adhere my first set of posts to the yellow back/roof panel. 


Then I glued the blue panel on top.  I also added a roof and topper using more dies from the Fairy House add on set.


I repeated the same steps for the pink panel.  Cut out windows.  Add paper.  Glue on posts.  Glue on panel.


For the very front panel I had a few more things to do.  Instead of windows I cut out an orange door.  I still added pattern paper behind it but didn't add it to the panel quite yet.  I cut a white fence using the fence die from the Garden Stand Flowers dies set.  I glued it to the green panel.  Now I added the door.  Next I tucked in a gray kitty and a butterfly from the Garden Stand Animals die set.  Then I added the green vines I cut from the Garden Gate dies set.  I cut several colors of flowers from the same die set and glued them on to the vine.


And then the final steps!  I added a vine to the middle panel and some flowers.  I used Crystal Stickles in the flower centers, along the roof sections and on the little butterfly.


And here is a view from different sides.


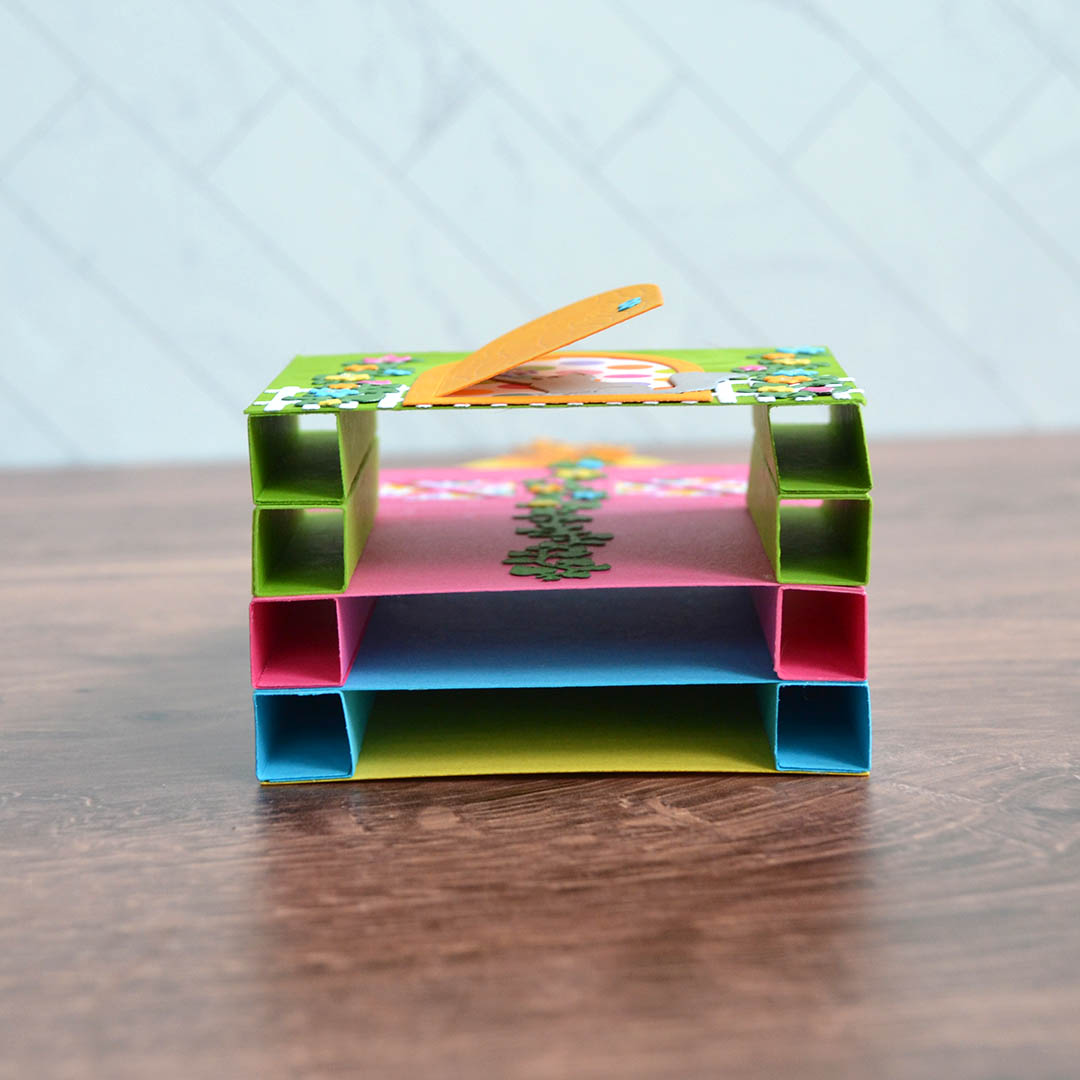
And a few close ups.


And there you have it!  One Encanto inspired slimline pop up card!

Thanks so much for visiting.  Hope to see you again soon!
~Kristina

Compensated affliate links may be used - I may receive a small commission at no additional charge to you should you make a purchase using my link.


Teflon bone folder
Teflon bone folder
Shop at:
EH
Tombow Mono Multi Liquid glue
Shop at:
EH | ACOT
Tonic Studios-Retractable Craft Pick
Shop at:
SBC | EH
Crystal Stickles
Crystal Stickles
Shop at:
SBC | EH
Slimline Brick Background die - Scrappy Tails Crafts
Shop at:
SCT
Garden Stand Animals dies - Scrappy Tails Crafts
Shop at:
SCT
Slimline Cobblestone die - Scrappy Tails Crafts
Shop at:
SCT
Slimline Flower Stand Pop Up dies - Scrappy Tails
Shop at:
SCT
Slimline Fairy House add on dies - Scrappy Tails
Shop at:
SCT
Garden Gate dies - Scrappy Tails Crafts
Shop at:
SCT
Garden Stand Flowers dies - Scrappy Tails Crafts
Shop at:
SCT

Sunday, May 1, 2022

Sublimation fun with Artesprix

My friends!  I'm SO excited about some brand new products now available from Artesprix!  If you aren't familiar with Artesprix, they are the creators of the Original Sublimation markers.  Basically, you create a design on regular copy paper with the markers and use a heat press to transfer the image to polyester or polyester coated blanks.  I fell in love with their products soon after they hit the marker.  

Fast forward to today.  They have added 8 colors of stamp ink pads to their line up.  AND, wait for it, FIVE colors of sublimation acrylic paint.  And a lightening agent so you can create a rainbow of different colors!

I've got two fun projects to share with you.  The first one is a pot holder.  It seemed like the perfect candidate to use with this gorgeous Daylily & Barberry from Colorado Craft.

The first step is to trace the potholder onto a piece of regular copy paper.


I opened up seven different colors of ink pads and grabbed my finger daubers.  I also grabbed my Memory Misti.  This made this process a WHOLE lot easier.  I dabbed on the color to one section, stamped, and cleaned.  Then I inked up the next section with a different color.  I repeated this seven times until I had a complete pattern.  This is what it looked like when I was done.


I turned on my Cricut Easy Press to 400 degrees.  While it heated up I taped the design to the blank.  I created a sandwich of protective paper, then the copy paper, the blank, and a final layer of protective paper.  Apply heat for 50 seconds.


I let it cool down for a moment and then carefully peeled up one edge.  You always want to do a peek test to make sure it looks good.  And then the full reveal!


Look at how vivid and bright those colors are!

I had so much fun making the pot holder, I had to try my hand at another project.  I grabbed the bookmark blank from my stash and got to work.

Same as before I traced around my blank.  I used some letter dies and masking paper to create my word.  Remember, these will need to be mirrored.  I made sure to cut them out from the sticky side instead of the regular side.  

I used the pink and purple ink pads directly on the background stamp.  I just alternated between the two colors.  I made sure to overlap a little so the transistions weren't too harsh.  Then I peeled off the letter masks and here was the result.


I followed the same steps as above except the bookmark only needs 45 seconds at 400 degrees.  And voila!  Super easy peasy!


And that's a wrap for today!  Thanks so much for stopping by.  May your day be fabulous!

~Kristina
Compensated affliate links may be used - I may receive a small commission at no additional charge to you should you make a purchase using my link.

Therm O Web Masking Magic Sheets
Shop at:
EH | ACOT
Memory Misti
Memory Misti
Shop at:
SBC
Ink daubers
Ink daubers
Shop at:
SBC
Daylily & Barberry - Colorado Crafts
Shop at:
SBC