Wednesday, April 27, 2022

Floral Fun Sequin Pillow with Artesprix

Hi friends! I'm bringing you something a little different today as I’m super excited to be guest designing for Artesprix!  I’m generally a cardmaker/papercrafter but have gotten hooked on using Artesprix sublimation products.    It blew me away just how easy it is to use their sublimation markers!   Let’s dive in and take a look at my project.


 How fun is that??

 Materials used:

(Compensated affiliate links may be used – I may receive a small commission at no additional charge to you should you make a purchase using my link.)

 Original Sublimation Markers

Heat Tape

Protective Paper

Sequin Pillow Case

Sublimation Ink Pad

Heat Press

Mixed media paper

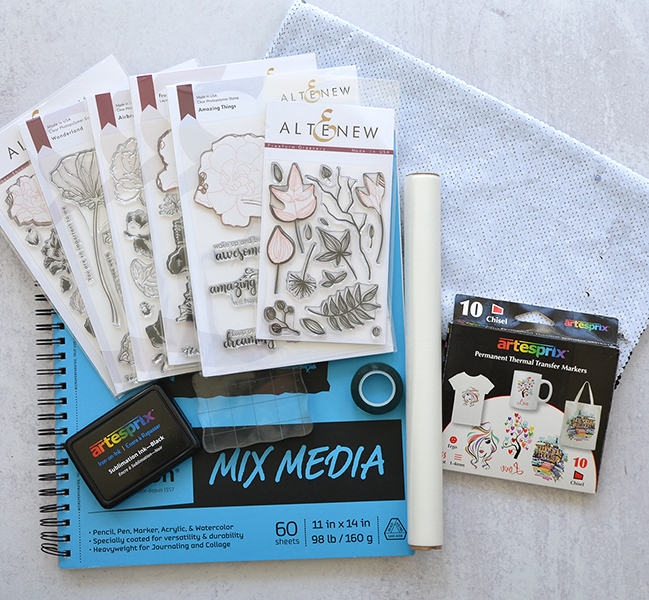
Assorted stamps from Altenew

Masking paper

Copy paper

16” Pillow form

Scissors

Acrylic blocks

Paint brush

Water bottle sprayer


What are Sublimation Markers?

Sublimation Markers and Ink Pad have a special formulation of ink.  With copy paper, home iron or heat press and a polyester or polyester coated blank you can create your very own sublimated project.  When heat is applied it causes the inks to transfer and adhere/sink into the blank.  This becomes a vibrant, permanent image!

Step 1:  Normally you would trace around your blank to create a template area to work in.   I specifically cut my paper to be smaller than the Sequin Pillow Case so no traced template needed.   I printed my desired words out onto a piece of copy paper.  I then used a light box to trace the letters.  I also created a mask for the words. 


Step 2:  Once the mask was in place, I got out my acrylic blocks, stamps and black Sublimation Ink Pad.  I stamped the flower and leaves stamps over and around the sentiment.  I added masks as need to stamp over other images.


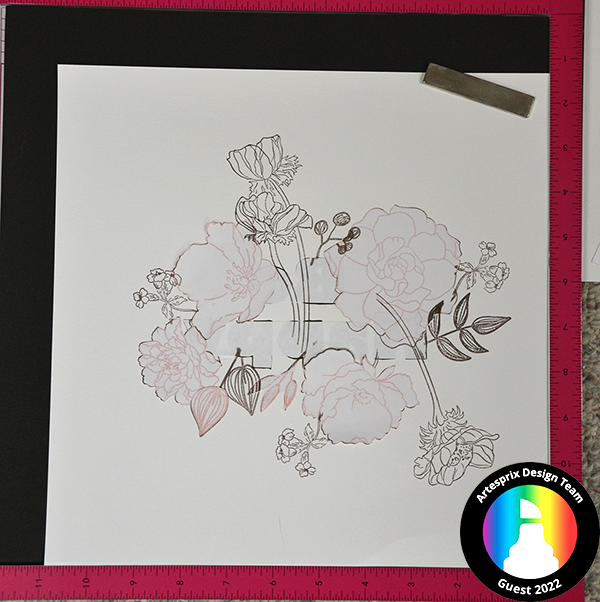
Step 3:  Remove all the masks!  I love seeing the reveal once you take all of the masks off.


Step 4:
  I added color to all of the images using the markers like watercolors.  I scribbled them on a palette, spritzed with water and applied it with a wet paint brush.  You can create shaded areas by adding multiple layers of color.


Step 5:  Very important!  Before taping your design to the pillow case, make sure ALL of the sequins are flipped to the white side!!  It’s really easy to do.  I applied lots of heat resistant tape around the edges of my design.  I found that the thicker paper was a little warped from all of the water I had used.  I didn’t want it to move!  You can also see that I have my sublimation sandwich in place.  One sheet on top of my design and one on the inside of the pillow case.


Step 6:
 For the Sequin Pillow Case blank you’ll need to set your heat press to 400 degrees and 60 seconds.


Step 7:  After the timer runs out it’s very important to do a peek test!  Just peel back a little bit of your design and see how well it transferred.  You can carefully put it back if you need more time/heat.


Step 8:  Reveal time!!  Look at this beauty!


Step 9:  Insert a 16” pillow form into the pillow case.  Step back and admire your work!


I absolutely LOVE how my pillow turned out!  I know it will make me feel happy every time I look at it. 

Are you intrigued by the mesmerizing (and easy!) world of sublimation inks and markers?  Then you need to take a look at the Artesprix Iron-on-Ink Inspirational Group over on Facebook.  Click HERE to check it out.  Want to see all the great sublimation products and blanks?  Then head to the Artesprix store to do a little shopping.

It’s been lots of fun sharing my project with you today.  Hope to see you soon!

Toodles!

~Kristina

Compensated affliate links may be used - I may receive a small commission at no additional charge to you should you make a purchase using my link.

Tonic Studios-Retractable Craft Pick
Shop at:
SBC | EH
Therm O Web Masking Magic Sheets
Shop at:
EH | ACOT
Cutter Bee Scissors - EK Success
Shop at:
SBC | ACOT
Ranger Distress Sprayer
Shop at:
EH | ACOT
Canson XL Mixed Media paper
Shop at:
ACOT

16" x 16" pillow form - Crafter's Choice
Shop at:
ACOT
Freeform Greenery stamps - Altenew
Shop at:
Altenew
Amazing Things stamps - Altenew
Shop at:
Altenew
Fresh Bloom stamps - Altenew
Shop at:
Altenew
Airbrushed Flowers - Altenew
Shop at:
Altenew
Wonderland stamps - Altenew
Shop at:
Altenew
Remember This - Altenew
Shop at:
Altenew

Monday, April 25, 2022

All the Shop Hop with Scrappy Tails Crafts

Welcome to the Scrappy Tails Crafts “All the Shop Hop”.   Today we are hopping along with all of the designers showcasing our favorites from our older releases, mixing them with the new.   The idea is to shop your stash and see how well the entire line from Scrappy Tails Crafts work together!   Sit back and grab your favorite beverage and snack and be inspired.  

As you hop along, be sure to leave your comments on each person’s blog and video to enter into the chance to win one of three $25 gift certificates to the Scrappy Tails Craft’s website! The more comments you leave, the more opportunities to win! If you enjoy the hop and all of the beautiful projects showcased, consider subscribing to each designer featured on the hop! Also, please consider subscribing to the Scrappy Tails Craft’s Youtube channel for more inspirational video tutorials and to never miss out on future giveaways. 

Let's check out my project!


I chose to combine the Spring Birds stamp set from last year's spring release and the new A7 Flower Cover Plate die.

My firs step was to stamp the birdbath onto Bristol Smooth cardstock with a hybrid black ink.  I added color using some Zig Clean Color Real Brush Markers and a water brush.


Then I used the A7 Flower Cover Plate die to cut out 3 of the floral frames from Desert Storm cardstock.  I used some liquid glue to glue the layers together.


Then I used the flower die from the set to cut out several different colors of metallic cardstock.  I chose to use colors similar to the coloring I did with the Zigs.  I glued them onto the flower frame base on the matching spots.


Before I glued the frame to the birdbath panel, I stamped the sentiment with the help of my regular size Misti.  Which was a real life saver since I didn't get a good impression with the first stamp.

I glued the birdbath panel onto a Desert Storm 5"x7" card base and then added the floral frame.  I decided I wanted to add more flowers since I still had several pieces left.  I also added clear Wink of Stella to all the parts of the frame that didn't have flowers.  And to finish it off I added Glossy Accents to the water in the birdbath.


Now, a few final hop details

The hop ends on Monday, May 2nd at 11:59 PM EST. Winners will be announced on the Scrappy Tails Craft’s Youtube channel and blog on Friday, May 6th

If you see something that catches your eye as you're hopping along, be sure to use our design team member’s affiliate links listed in their blogs and video descriptions! This is no added cost to you, it’s just a fun way to support our crafty friends!


Thanks for stopping by!

The next fabulous person on the hop is Silvia! Click HERE


Disclaimer:

Disclaimer: We must mention that this is in no way sponsored, administered or associated with Youtube. By entering, entrants confirm that they are 13+ years of age, we release Youtube of responsibility, and agree to their terms of use.

Have fun hopping along!
~Kristina
Compensated affliate links may be used - I may receive a small commission at no additional charge to you should you make a purchase using my link.
Persian blue 32 Zig Clean Color marker
Shop at:
EH
Wink of Stella - Glitter Clear
Shop at:
EH | ACOT
Tonic Studios-Retractable Craft Pick
Shop at:
SBC | EH
Tim Holtz Idea-ology 8x8 Metallic - Confections
Shop at:
SBC | ACOT
Strathmore Bristol Smooth paper
Shop at:
EH | ACOT
Ranger Tim Holtz Water Brush - Fine Brush
Shop at:
EH | ACOT
Obsidian Amalgam  ink pad - Gina K
Obsidian Amalgam ink pad - Gina K
Shop at:
EH
Glossy Accents
Glossy Accents
Shop at:
EH | ACOT
Mid Green 46 - Zig Clean Color marker
Shop at:
EH
Desert Storm Neenah Cardstock
Shop at:
EH
Bright Yellow 52 Zig Clean Color real Brush
Shop at:
EH
Plum gray 808 Zig Clean Color Real brush marker
Shop at:
EH
Smoky Teal 304 Zig Clean Color marker
Shop at:
EH
Aquamarine Blue 304 Zig Clean Color marker
Shop at:
EH
Deep Vermillion 208 Zig Clean Color marker
Shop at:
EH
A7 Flower Cover plate die - Scrappy Tails Crafts
Shop at:
SCT
Spring Birds stamps - Scrappy Tails Crafts
Shop at:
SCT
Regular sized Misti
Regular sized Misti
Shop at:
EH

Friday, April 1, 2022

Scrappy Tails Crafts Flower Shop hop

Welcome to the Scrappy Tails Craft’s Flower Shop blog and video inspiration hop! Today, we are hopping along to celebrate the launch of our new Spring collection! Each designer along the hop will be showcasing new products from the release to hopefully give you ideas and inspiration for your Easter and Spring cards.

 As you hop along, be sure to leave your comments on each person’s blog and video to enter into the chance to win one of two $25 gift certificates to the Scrappy Tails Craft’s website! The more comments you leave, the more opportunities to win! If you enjoy the hop and all of the beautiful projects showcased, consider subscribing to each designer featured on the hop! Also, please consider subscribing to the Scrappy Tails Craft’s Youtube channel for more inspirational video tutorials and to never miss out on future giveaways.

The hop ends on Friday, April 15th at 11:59 PM EST. Winners will be announced on the Scrappy Tails Craft’s Youtube channel and blog on Saturday, April 16th.

If you see something that catches your eye as you're hopping along, be sure to use our design team member’s affiliate links listed in their blogs and video descriptions! This is no added cost to you, it’s just a fun way to support our crafty friends!

My project for the hop is a garden...of critters!


I know there are SO many beautiful flowers in this release but the critters from the Garden Stand Animals dies stole my heart.  I just KNEW I needed to create something fun just for them.

I started with a piece of white cardstock 8"x 3".  I took the Slimline Cobblestone Background die and cut a piece of scrap cardstock to create a diy stencil.  I masked off most of the white panel with low tack tape except for about an inch at the bottom.  Next I grabbed some pale gray ink, a blending brush and my diy stencil.  I laid the stencil over the exposed border on the panel and added ink.

After removing the masking tape, I used a cloud stencil from my stash with a light blue ink.  This gives me the look of having ground and sky.


Now on to the other parts for my card. I got all of the dies from the Garden Stand Animal dies set.  I pulled a whole rainbow of colored cardstack out of my stash.  I cut all six critters out of a different color of cardstock.  The Corgi die has a few extra detail dies.  I cut them out of different shades of yellow.  I also took Copic markers in slightly darker colors than the cardstock and added some shadows.


How about something for them to "grow" in?  The flower pots from the Potted Flowers die set to the rescue.  I cut each pot out three times from silver foil cardstock.  I tucked my critters behind each pot and cut off the extra parts.  Then I applied them in a row across the card.

Next I cut out two little butterflies.  One comes from the Potted Flower die set and the other comes from the Flowers & Rain Boots die set.  These were added to the card.  I did fold up the wings just a bit to give them some dimension.  Now for the sentiment.  The Smile sentiment is from the Mini Smile incentive freebie set.  I cut it out four times in total and stacked them up before adding them to the card.  

I went ahead and added the panel to a rainbow diagonal striped paper from my stash.  And then onto a slimline card base 3 3/8" x 8 3/8".  For the final extra touch I added Star Dust Stickles over the Smile.  There you have it!  Did you happen to notice?  My entire slimline card is made out of dies.  Not a single stamp in sight!  


Thanks SO very much for stopping by!

Ready for another dose of inspiration?  Head HERE to visit Brenda Noelke next!


Have fun hopping!
~Kristina
Compensated affliate links may be used - I may receive a small commission at no additional charge to you should you make a purchase using my link.

Teflon bone folder
Teflon bone folder
Shop at:
EH
Tombow Mono Multi Liquid glue
Shop at:
EH | ACOT
Tonic Studios-Retractable Craft Pick
Shop at:
SBC | EH
Stick It Adhesive sheets
Shop at:
SBC | EH
Therm O Web Masking Magic Sheets
Shop at:
SBC
Natural White Neenah cardstock
Shop at:
EH
Trinity blending brushes
Shop at:
EH | T
Star Dust Stickles
Star Dust Stickles
Shop at:
EH | ACOT
Potted Flowers dies - Scrappy Tails Crafts
Shop at:
SCT
Flowers & Rain Boots dies - Scrappy Tails Crafts
Shop at:
SCT
Garden Stand Animals dies - Scrappy Tails Crafts
Shop at:
SCT
Slimline Cobblestone die - Scrappy Tails Crafts
Shop at:
SCT
Rainbow Bright paper pack - Sunny Studio
Shop at:
SBC