Showing posts with label foiling. Show all posts

Sunday, December 18, 2022

Snowflake trio

Hello friends!!  I couldn't make up my mind what kind of cards I wanted to make today so I just grabbed lots of different goodies.  I like to think it paid off since I came up with three different designs!  And each card has one thing in common, the Slimline Snowflake Corner stencil.  

Let's talk cards.  Here is the first card created.


I know you are like, Kristina, I don't see that snowflake stencil!  Well, let's start at the beginning shall we?


I grabbed the Christmas Mica Distress Stain sprays and the Slimline Snowflake stencil.  I created the piece on the far right first.  Then I misted the stencil before cleaning with some water.  I put it down on a piece of white cardstock.  It turned into the middle piece.  I put it down several times all over the paper.  And then we have the piece on the left.  I first spritzed the cardstock with the mica sprays.  Once it was dry, I layed the stencil on top and sprayed again with mica sprays.

Back to cardmaking.  I used the Slimline Snowflake Coverplate die to cut out a piece of white cardstock.  I added liquid glue to adhere it on top of the mica stained piece and I cut off the excess.


I layered it onto a pink slimline layer and then I added it to a white slimline card base.  Now I dug into the rest of my Scrappy Tails stash to find some sentiments.  I combined pieces from the Cardinal Blessings and Fairy Sentiments set.  I stamped "Hope you have a" and "Christmas" from the Cardinal Blessings set in black ink onto pink cardstock.  I cut them down with scissors into strips. 

"Magical" was stamped with Picked Raspberry Distress Oxide ink because I wanted to emboss it.  I sprinkled it with clear embossing powder and melted it with the heat tool.  Once it was completely cool I cut it out with the Fairy Sentiments dies.  I love how it cuts out all the swirly bits of the first letter in the word!  Then I just adhered them to the card panel.


Let's move on to my second card!  For this card I used the slimline piece where the snowflake stencil image was very defined (see panel on the far right above).


This panel was already pretty darn gorgeous so I wanted to limit the amount of things I added to it.  First I cut it down to a mini slimline size.  Next I pulled out some foil cardstocks in my stash that worked well with the panel.  Then I dug around in my Scrappy Tails stash.  I found this beautiful deer in the Winter Essentials die set along with the winter wishes words.

I simply cut them out and glued them to the stenciled panel and added it to a gray mini slimline card base.  And card number two is done!


Which bring us to the third and final card.


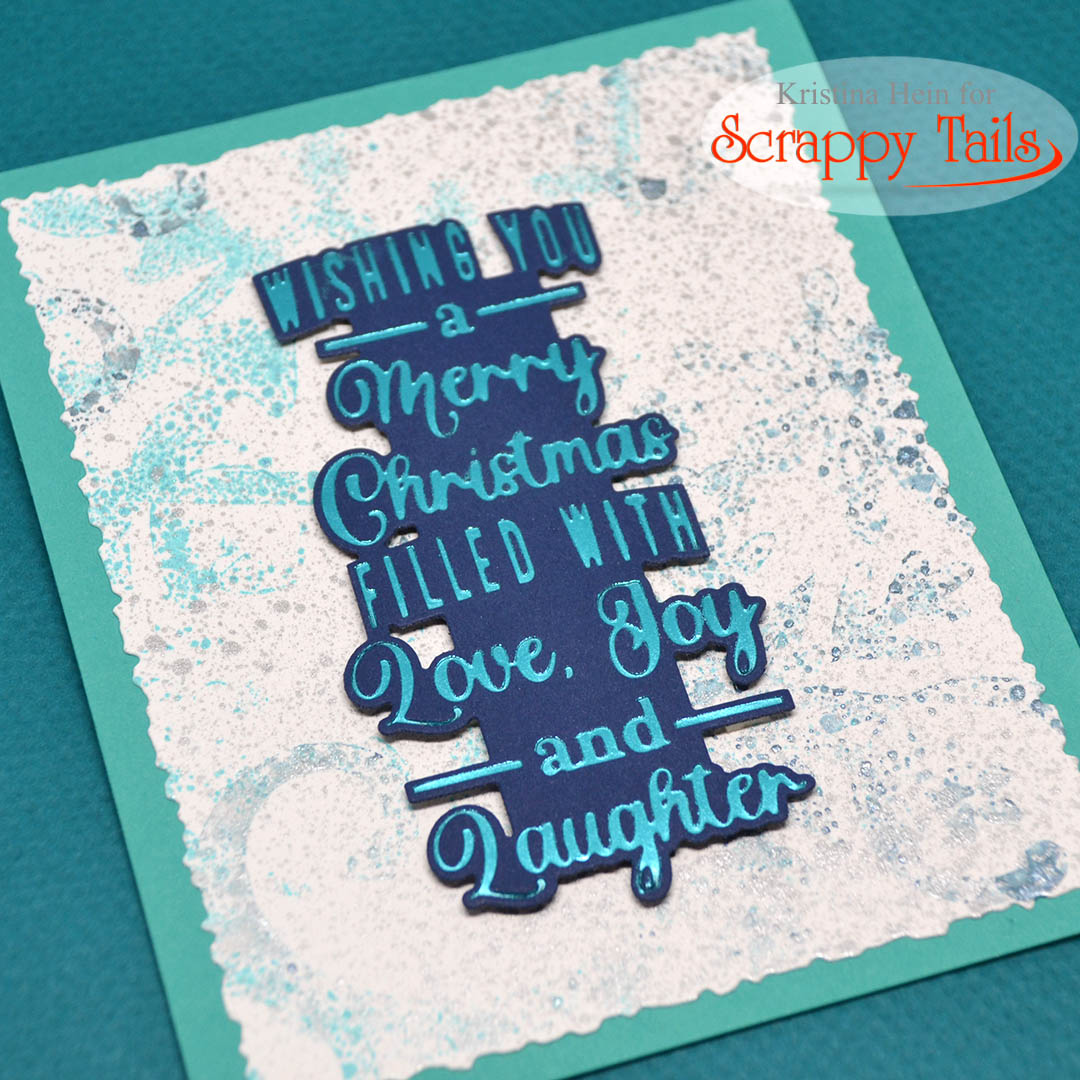
All I have left is the A2 sized card panel (middle panel from above).  It was another case of a lovely background piece I didn't want to cover up!  So, I cut it down a bit with a deckle edge die and added it to light teal card base.  Want to guess what I did next?  Yep, dug around in my Scrappy Tails stash.  I found a gem too!  The Hot Foil Christmas Sentiment dies and the Coordinating Sentiment dies.  

I used the Christmas Sentiment die with a piece of turquoise foil and hot foiled it onto a piece of navy cardstock.  Next I cut it out with the coordinating sentiment dies.  I added foam tape pieces to the back of the foil sentiment and adhered it to the card.  That's it.  Third card complete.


Thanks so much for visiting my corner of the crafty world!  

Toodles!
~Kristina

Teflon bone folder
Teflon bone folder
Shop at:
EH
Neenah Solar White
Neenah Solar White
Shop at:
SBC | EH
Tombow Mono Multi Liquid glue
Shop at:
EH | ACOT
Tonic Studios-Retractable Craft Pick
Shop at:
SBC | EH
Therm O Web Foam Tape
Shop at:
SBC | EH
Ranger Clear embossing powder
Shop at:
SBC | EH
Distress Oxide - Picked Raspberry
Shop at:
SBC
Heat Tool
Heat Tool
Shop at:
SBC | ACOT
Fairy Sentiments - Scrappy Tails Crafts
Shop at:
SCT
Fairy Sentiments dies - Scrappy Tails Crafts
Shop at:
SCT
Cardinal Blessing stamps - Scrappy Tails
Shop at:
SCT
Slimline Snowflake Corner stencil - Scrappy Tails
Shop at:
SCT
Slimline Snowflake Coverplate die - Scrappy Tails
Shop at:
SCT
Winter Essentials dies - Scrappy Tails
Shop at:
SCT
Hot Foil Christmas Sentiments - Scrappy Tails
Shop at:
SCT
Hot Foil Christmas Sentiments Coordinating dies
Shop at:
SCT
Turquoise Gemini Foil
Shop at:
EH

Saturday, June 12, 2021

For Dad

Hello there!  Father's day will soon be here so I figured this was the perfect time to share a card just for Dad!  I'm using a fabulous digital stamp set from Rachel Vass Designs called Summer Leaf Background.  You can find this beauty in her Etsy store HERE.


And here's what I created!


I printed the Summer Leaf background out onto white cardstock.  I cut a piece of lime and a piece of turquoise foil to cover two parts of the background.  I ran it through my Minc.  Here's a second photo so you can actually see the color of the foils.


From there it was a simple process.  I cut the background into 1" wide strips.  I added foam tape to the back and mounted them on a lime piece of cardstock.  

I made a side fold card base out of turquoise cardstock.  I used a background stamp from my stash and a a matching ink to give it a little texture.  Then I adhered the lime panel to the card base. 

I cut the Dad out with the same turquoise cardstock and a die from Pretty Pink Posh.  I cut it out two more times out of black cardstock and glued all of the layers together.  Then I glued them onto the card.

Thanks SO much for stopping by.  I do hope you'll check out the Rachel Vass Design Etsy shop HERE.  

Toodles!
~Kristina

Supplies used:

Compensated affliate links may be used - I may receive a small commission at no additional charge to you should you make a purchase using my link.

Teflon bone folder
Teflon bone folder
Shop at:
EH
Neenah Solar White
Neenah Solar White
Shop at:
SBC | EH
Tombow Mono Multi Liquid glue
Shop at:
SBC | EH
Therm O Web Foam Tape
Shop at:
SBC | EH
iCraft Deco Foil - Turquoise
Shop at:
SBC | EH
Lime Deco Foil
Lime Deco Foil
Shop at:
EH
Dad/Father Scripts - Pretty Pink Posh
Shop at:
EH

Wednesday, March 17, 2021

Fabulous fun with foils!

Hello and welcome!  Today I'm over on the Stamplorations blog as a guest digital designer.  I bring you a trio of cards created with the French Marigold digital stamp.  And of course, some foil!


I enlarged the marigold and tilted it at an angle before printing it out twice onto copic friendly cardstock.  The first one I traced around an oval die so I would know what areas I needed to cover with color.  Then I got out my Copic markers to do the coloring.  Did you know there is a variety of French Marigold called Strawberry Blonde?  This is what inspired my color choices.  


Next I cut it out with an oval die.  I used a Zig 2 Way squeeze and roll glue pen to add bits of glue to some of the outer edges of the petals.  I let it dry for a minute or two until sticky.  Then I took a of sheet of gold foil and laid it on top.  I rubbed over it with my fingers and slowly peeled it off.  I love this method to add touches of gold to any piece without having to use a Minc or laminator.


The second marigold piece I cut with a stitched rectangle die just slightly smaller than A2 size.  I splattered the entire piece with gold, then silver splatters.  Once it was dry I added it to a coral card base.  I put foam tape on the back of the oval, lined it up over the splattered panel and adhered it to the card.  Easy peasy!


My second card was an experiment that totally paid off!
  

I inverted the color of the digital stamp so it made the lines white and the area around it black.  I printed it out with my laser printer. Then I cut a piece of Rainbow Shattered Glass foil large enough to cover it and ran it through my Minc twice.  I peeled it back and found this beauty waiting for me.

 
I'm not going to lie.  I ma have gazed at it for a while before I could bring myself to cut it apart.  I cut it into 4 equal parts and added a white piece of cardstock behind each of the pieces.

Next I grabbed a piece of black cardstock and the Bloomdalascopic #7 stencil.  I ran them through my die cut machine to get a subtle embossed pattern on the black cardstock.  To help bring out the embossing I swiped a platinum ink pad lightly across the surface.  I also added some white splatters.


I cut the black panel down to fit onto a 5" square white card base.  I added foam to the back of the foiled squares and added them to the card.  I finished it off by adding a sentiment sticker from the Just Everyday Greetings sticker pack.


My third card is actually a bonus card I got from the project above!  When I did the foiling for the second card I had the leftover foiled flower.  I couldn't bring myself to throw it away.  I grabbed a piece of toner paper and ran it through my Minc with the foiled flower leftover.


Isn't it so cool?  I cut it into 4 pieces and added different colored cardstock behind each square.  I took a piece of black cardstock and cut it to 6 1/4" x 3 1/4".  I taped the Half Circles slimline stencil over it and spread Pixie Effect paste over it.  Once the paste was dry I added it to a white mini slimline card base.  Then I adhered on the foiled squares.  


That's it for me today.  I hope you found something that inspired you!  Don't forget that you can get 20% off in the Stamplorations store by using the code STAMPGIRLKRISTINA.

~Kristina

Supplies used:
Compensated affliate links may be used - I may receive a small commission at no additional charge to you should you make a purchase using my link.

Teflon bone folder
Teflon bone folder
Shop at:
EH
Gold Foil - Deco Foil
Shop at:
SBC | EH
Antiques Silver Spray - Altenew
Shop at:
Altenew
Neenah Solar White
Neenah Solar White
Shop at:
SBC | EH
Tombow Mono Multi Liquid glue
Shop at:
SBC | EH
White Ink Spray - Avery Elle
Shop at:
SBC | EH
Lawn Fawn Black Licorice Cardstock
Shop at:
SBC
Copic Marker Y13
Copic Marker Y13
Shop at:
EH
Zig 2-way glue pen
Zig 2-way glue pen
Shop at:
SBC | EH
Dew Drop Planetarium metallic ink set - Tsukineko
Shop at:
SBC
Pixie Effect Paste - Prima
Shop at:
SBC
Therm O Web Foam Tape
Shop at:
SBC | EH
Toner Sheets - Deco Foil
Shop at:
SBC | EH
Infinity Nesting Oval dies - Hero Arts
Shop at:
SBC | EH
R30 Copic marker
R30 Copic marker
Shop at:
EH
R32 Copic Marker
R32 Copic Marker
Shop at:
EH
R35 Copic Marker
R35 Copic Marker
Shop at:
EH
G02 Copic Marker
G02 Copic Marker
Shop at:
EH
G03 Copic Marker
G03 Copic Marker
Shop at:
EH
G05 Copic Marker
G05 Copic Marker
Shop at:
EH
G09 Copic Marker
G09 Copic Marker
Shop at:
EH
Rainbow Shattered Glass Foil - Deco foil
Shop at:
SBC | EH
Antique gold spray - Altenew
Shop at:
Altenew | SBC
Copic Marker Y15
Copic Marker Y15
Shop at:
EH
Copic Marker Y11
Copic Marker Y11
Shop at:
EH
A2 Stitched Rectangle Stax Set 1 dies -My favorite things
Shop at:
EH