Showing posts with label 2cuteink. Show all posts

Sunday, March 6, 2022

Hello Friend

 Hi there crafty friends!  Today I've got a fun card for you featuring the latest digital release from the 2 Cute Ink Etsy shop.  The set is called Winter Fun Animals and you can find it HERE.


I printed the moose onto a piece of Neenah Solar White cardstock.  The snow drift lines didn't extend as far as I needed them so I used a Copic safe black marker to extend it.  Then I printed the same image again on regular copy paper.  I trimmed out the snow and the moose.  I used Mono Multi Liquid glue on the back to spread a thin coat.  If you let it dry it becomes a removeable mask.

Once it was dry, I put it over the cardstock panel.  I used ink blending sponges to add Milled Lavender, Spun Sugar and Tumbled Glass Distress Inks.  I splattered lightly with water and dabbed it off.

For the snow drifts I used Copic markers.  C1, C0 and C00.  I grabbed a large stack of Copic colors and colored up the cute moose!  N5, 3, 1, E27, 25, 23, RV19, 17, 02, BG18, 15, 13, E35, 33, 31, V09, 06, 05, 01 and the colorless blender.


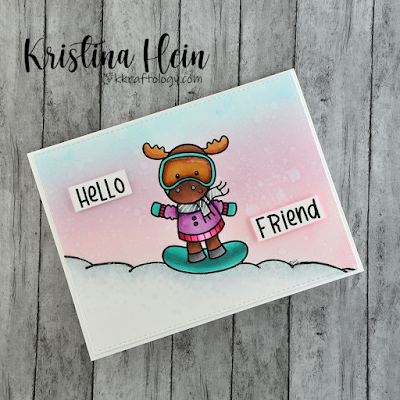
I added some extra details on the scarf with white gel pen.  I added Glossy Accents to the mask and Stardust Stickles to the tops of the snow drifts.

I used the Hello Friend sentiment from the same stamp set.  I went around the edges with Copic colors that matched the background.  Then I added foam tape before attaching them to the card.  All done!

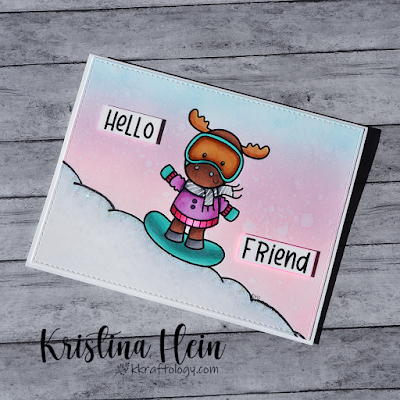
You should head to the 2 Cute Ink Etsy store and check out all of the great sets!  I tried to catch the shimmer of the Stickles in the last photo.


See you again soon!
~Kristina
Compensated affliate links may be used - I may receive a small commission at no additional charge to you should you make a purchase using my link.
Teflon bone folder
Teflon bone folder
Shop at:
EH
Tombow Mono Multi Liquid glue
Shop at:
SBC | EH
Mini Ink Blending Tool
Shop at:
SBC | EH
Kuretake ZIG Millennium pen set
Shop at:
SBC
Therm O Web Foam Tape
Shop at:
SBC | EH
Distress Ink - Tumbled Glass
Shop at:
SBC | EH
White Gelly Roll pen
Shop at:
SBC
Spun Sugar Distress Ink
Shop at:
SBC | EH
Natural White Neenah cardstock
Shop at:
EH
Glossy Accents
Glossy Accents
Shop at:
SBC | EH
Stitched Rectangle dies - Paper Rose Studio
Shop at:
SBC
Star Dust Stickles
Star Dust Stickles
Shop at:
EH
Milled Lavender Distress ink
Shop at:
SBC | EH

Friday, October 30, 2020

One last Halloween card!

 Yep.  I did it.  I managed to get one more Halloween card done.  Woot!  My card today features a brand new digital stamp from 2 Cute Ink called Witchy Fishy.  It is brand new in the Etsy Store today.  Head HERE to check it out.


Isn't he just the cutest?  I colored the entire scene using Copic markers.  The papers are from an older Doodlebug paper pad called Boos & Brews.  I also added some matte Doodlebug sprinkles.  I used glossy accents on the glasses and the bubbles.  And there is a wash of metallic gold paint over the moon.  I hope you love this little fishy as much as I do!


Thanks for visiting!
~Kristina


Wednesday, December 12, 2018

Winter Cardinal

Hey there fellow 2 Cute Ink fans!  I'm here with a winter themed project to share with you today.


Isn't this Winter Cardinal just the cutest darn thing ever?  I know, I say that about all of Heidi's stamps but I just can't help myself.    First off, you can get your hands on this digital stamp right HERE.

I decided to use my colored pencils to color up this little cutie.  I also picked my colors based on the patterned papers I had picked out.  All of the colored pencils I used are Prismacolors.

Red PC122, PC926, PC195, PC930
Green PC908, PC911, PC912
Brown PC1082, PC941, PC140
Blue PC901
Snow PC1059

I used Gamsol and a blending stub to smooth out the pencils.  I forgot how lovely the colors look when blended with Gamsol.  All of the layers were cut out using circle dies from Elizabeth Craft Designs.  The patterned paper is from Echo Park's Deck the Hall paper pad.  For the cardbase layer I used a brown from Stampin Up.

I cut all of the layers out and glued everything together.  For the final touches, I added Star Dust Stickles to the snowflakes and Frosted Lace Stickles to the snow.  All done!  Now grab this digital stamp for yourself and get to crafting!


~Kristina

Saturday, December 1, 2018

Penelope cat gets her coffee

Another one of my favorite times of year has arrived at last.  The Fall/Winter Coffee Lovers blog hop!!!  The chance for me to ink up some of the coffee themed stamp sets I have been shamelessly collecting.  It totally justifies their purchase, right??  Anywho, I'm hoping to complete several cards for this round so wish me luck.


Here is my first card to share!


I used this adorable digital stamp from 2 Cute Ink called Penelope Cat.  You can purchase her right HERE.  I printed her out onto Cryogen White Copic safe cardstock.  I had already pre-picked the main piece of patterned paper I wanted to use so I went through my Copics looking for colors that would match.  Here is the list of colors used.

Cat T1, T3, T5
Cheeks & inner ears R00
Table E71, E74, E77, E79
Coffee E23, E27
Mug & Flowers YG61, YG63, YG67
Scarf RV63, RV66, RV69

Once she was all done I moved on to the rest of the pieces.  I cut her out with a Wonky Rectangle die from MFT Stamps.  I handcut a thin green layer out of a coordinating solid green cardstock from Stampin' Up.  Now, can we talk about this background??  The base aqua coffee patterned paper is from an older paper pad.  It is called Winter Wonderland from Pebbles.  I also pulled the pinkish patterned paper from the same paper pad.  Now came some more fun.  I cut it with a plaid die!  My crafty heart goes a little mushy when I get to use this die.  It is the Diagonal Plaid die from Lil' Inker Designs.  It's awesome.

I glued the coffee print paper to a pink cardbase.  Next came the plaid pinkish paper, the green layer and the cat layer.  For the final touch I added some different sizes of sparkling clear sequins from Pretty Pink Posh.  And that's it.  It's a pretty simple card even with the Copic coloring.  I encourage you to check out the 2 Cute Ink Esty store here.  I also want to encourage you to play along with the Coffee Lovers blog hop.


You can link up your creations HERE.  Be sure to use #fallwinter2018clh!

 Happy Crafting!
~Kristina

Wednesday, November 21, 2018

Thanksgiving

Thanksgiving is almost here!  Yikes.  I can hardly believe it.  That means Christmas is going to sneak up on me so fast!  Deep breath.  I wanted to squeeze in one more fall card before it becomes all Christmas all the time.  Seeing how tomorrow is Thanksgiving, I figured a Thanksgiving themed card was in order.


I started by printing out this little guy onto natural white Neenah cardstock.  I had already picked out the plaid paper to use so I grabbed my copic color chart and started picking markers.  Here are the colors I used:

Mouse: E81, 84 & 87
Ears, Nose & Cheeks: R00.  The ears also have a little bit of E81 to tone down the pink.
Pumpkin: YR12, 15, 18, 27
Stem, swirl & feet pads: BG96, YG63, 67
Yellow flower: Y11, 13, 18 Center: E87, 89
Rust flower: E15, 17, 18 Center: Y13, 15

Once I was all done with coloring I used my Scan n Cut to cut him out with a little border.  I went back to the plaid paper.  This is from Carta Bella's Fall Blessings paper pad.  I pulled out two other patterns that went well with the plaid.  An orange and a green.  I really wanted a non standard die shape for my layers so I went digging through my stash.  I found these beautiful Label 55 dies from Spellbinders.  I cut the green and the orange papers with different sizes of the same die set.  Then I cut the plaid paper with a scalloped rectangle die from Mama Elephant. 

I sponged the edges of the plaid paper with a mossy green.  I decided to cut my label dies so that they would be flat on the bottom and line up with the stitched edge of the plaid paper.  I sponged the edges of the orange paper but left the green one alone. I glued the mouse directly onto the green paper and glued the rest of the layers together.  These were then glued onto a Neenah natural white card base.

I stamped the Happy Thanksgiving sentiment onto another piece of the Neenah paper with the same mossy green ink I used to sponge the plaid paper edges.  I cut it down to a small rectangle and sponged those edges with the orange ink.  I used a piece of foam tape on the back to pop it up from the card.

I thought it needed just a little something more.  I didn't quite like the look of sequins but I did find these gorgeous gold gems from Pretty Pink Posh in my stash.  Just perfect.  And that's it!  I hope you like my little mouse card and that you have a wonderful Thanksgiving.


You can pick up the Pumpkin Mouse digital stamp right HERE in the 2 Cute Ink Etsy store.  Be sure to check out all of the great digital stamps Heidi has in her shop!  Come on over and check out her Facebook group too!  2 Cute Ink Digital Stamp Fans


I'll be back soon!
~Kristina

Wednesday, November 14, 2018

Marshmallow Snowman

Howdy and hello!  I don't know about your neck of the woods but it has taken an abrupt turn to the cold here.  Yikes!  I'm really not ready for this at all.  I am ready to create with adorable winter type images though.  One of the newest digital stamps "Marshmallow Snowman" from 2 Cute Ink fits the bill.


Can you handle the cuteness?!!

I reduced the transparency of the digital stamp so it would be gray instead of black.  I then printed it out onto watercolor using my laser printer.  Then I picked out several distress inks to use as my watercolors.  I ended up with Chipped Sapphire, Blueprint Sketch, Peacock Feathers and Tumbled Glass.  I put clean water down first all around the snowman.  I then used a palette to squish the pads against.  I added water to give them a liquid consistency.  I just started randomly adding the colors to the water already on the background.  I let it sit overnight to dry.

The next day I picked up where I left off.  I mixed a little bit of Pumice stone with water and silver Finetec watercolor.  Again I put down clean water first in the snow area.  I used a brush to dab on the Pumice Stone mixture.  I heat set it and then went back to add more layers until I was happy with the results.  I heat set it again. 

Now I moved onto the snowman himself.  I did all of the small areas first.  Spun Sugar for his cheeks, a mix of Carved Pumpkin and Ripe Persimmon for his nose, Black soot for his hat and buttons and Wilted Violet for the scarf.  I heat set everything.  For the white areas of the snowman, I just kept watering down the black soot until it was pale enough.  I concentrated the darker color near the edge and spread it out with water. After heat setting, I went back and added a few more layers to the scarf, the hat and the body until I got the dimension I was looking for.  Heat set yet again.  I wanted to have even more detail so I went over his stick arms with Black Soot.  I used a black glaze pen on his buttons, his mouth and his eyes.  Once the eyes were dry, I added little dots of white.  I then used the same white gel pen to add highlights to the nose, hat and the snowman body.  I also added the striped detail to the scarf.  I mixed white paint with more of the silver finetec and lightly splattered the entire card front.

Once the card front was dry, I cut it down to a 4 1/4" square.  I glued it onto a 4 1/2" purple layer.  I applied a generous amount of foam tape to the back of the purple paper.  My white card base is a 5 1/8" square.  To the base I glued the striped piece of Doodlebug patterned paper.   The striped paper is cut into 5" square.  I then put all of the layers together.  For the finishing touches I added a couple Doodlebug Sprinkles and a few drops of Crystal Stickles.

Now, hurry over right HERE and pick up this adorable digital stamp for yourself!


Have a fabulous day!
~Kristina

Thursday, November 8, 2018

Let's get Toasty!

Hello there my crafty friends!  I'm here with another 2 Cute Ink design team project for you.  Heidi keeps on creating these super cute images!  I know I keep saying it but I can't help it!  Without any further ado....


I'm trying to participate in Kathy Racoosin's 30 day coloring challenge as I can.  These cuties were the result!

I lightened the digital stamp before printing it out onto Cryogen White cardstock.  The entire image was colored with Copic markers.  I did add some eyelashes with a very fine point black marker to the girl marshmallow.

Boy marshmallow: E40, 41, 43,44 
Boy scarf: G40, 43, 46
Girl marshmallow: E40, 41, E43
Girl scarf & hat: E81, 83, 85, 89
Cheeks for both: R20
Fire: YR21, 24, 27
Log: E71, 74, 77, 79
Ground: W00, 01, 03, 05

I cut the whole image out using a die from Papertrey Ink.  I cut a larger layer using a rose pink cardstock and glued the two layers together.  For the card base I used a very pale gray piece of cardstock.  I felt it needed a little bit more.  I used a stencil, a pale gray ink and a stencil brush to create a little bit of texture on the base.  You can see it if you look closely in the photo.  I like the way it adds to the overall design.

Before gluing the marshmallows onto the base, I popped it up using foam tape.  For a little more bling, I added dots of White Blizzard Nuvo glitter drops.  I also added Stardust Stickles to the fire to give it some sparkle.  That's it!  I opted not to put a sentiment on the outside so I can use it for whatever I need later!

Now, you need to head HERE to get your hands on the Toasty Marshmallow digital stamp.  While you are there be sure to check out the entire selection of 2 Cute Ink stamps.  Heidi has over 300 digital stamps to choose from!  For even further cuteness, come join her group on Facebook.  2 Cute Ink Digital Stamp Fans.

I'll be back real soon.
~Kristina

Wednesday, October 24, 2018

Scarecrow kitty cat

I can't believe how quickly fall is already beginning to fly by.  I want to hold onto this season for as long as I possibly can.  I guess that means I need to keep on making fall themed cards to share so here we go with my next creation!


This scarecrow cat digi stamp is just so very adorable.  You can add him to your collection right HERE.  He's an absolute steal for $2.99!!

A whole lot of love went into this card.  I'm sorry I forgot to take pictures along the way.  I tend to get caught up in the creating and forget to snap photos.  I'm working on it!  The whole project began by playing with alcohol inks and Yupo paper.  I love just sitting and seeing what I can make the colors do with the alcohol inks.  I started by putting a bit of blending solution all over the piece of Yupo.  Then I started adding random dots of Valencia, Rust, Meadow and Oregano.  I like to use a straw to blow the colors around.  Add a little more blending solution, more inks and so on.  If you've ever worked with alcohol inks, you know how this goes.

Once I was pretty happy with my background piece, I mixed a bit of the gold mixative with the blending solution.  I then used a paint brush to splatter some of the gold onto the background.  I set it aside to dry for about 10 minutes.  I grabbed a scrap piece of gold foil leftover from a previous foiling project.  I layed it down on different sections of the background and rubbed it with my fingers.  When you pull it back up bits of the gold stay behind on the semi sticky portions of the ink.  Can you say instant bling?  After it was totally dry, I die cut it with a beautiful die from Papertrey Ink.  Love it!

Now onto coloring this little guy.  I knew what size he needed to be to fit into the open rectangle so I sized him down and printed him out onto Copic safe paper.  I then proceeded to make a huge mess on my desk by pulling out lots of Copic markers.  Here's what I used:

Cat body/ears/feet: W3, W5, W7
Inner ears & cheeks: R20 which I went over with a W1 to tone it down
Outfit & hat patch: B95, B97, B99
Kerchief: YG93, YG95, YG97
Hat: E35, E37, E39, E59
Pumpkins: YR15, YR68, YR27 Stem: YG93, YG95
Grass: E31, E35, E37, E39, YG93, YG95, YG97

I used a white, gelly roll pen to add a details to the eyes, cheeks, patch, kerchief and pumpkin.  I cut the kitty piece down to just a little bit larger than the rectangle opening so I could glue it to the backside of the die cut piece.  I dug through my paper stash to see what would work as a background for the inked piece.  I found this linen look piece in Echo Park's Celebrate Autumn 6x6 paper pad.  I glued the die and the paper together.  I then trimmed it down to fit an A2 sized card base and glued it on.


For my finishing touches I added some metallic gold confetti sequins from Pretty Pink Posh.  Voila!    Remember, there are tons more great digital stamps to be found in the 2 Cute Ink Etsy store right HERE!


Have a fabulous day!
~Kristina

Wednesday, October 17, 2018

Boo to you!

Howdy and hello to you all!  I'm back today with some more good news to share.  After being a long time fan (and collector) of 2 Cute Ink digital stamps, I'm now a design team member!  That means there will be lots of cuteness headed your way!

Right now she has a Boo-tiful Challenge going on over on her Facebook group and social media.


You can join the Facebook group right HERE.  The super cute, Boo-tiful ghost to use in the challenge is available HERE in Heidi's 2 Cute Ink Etsy store!

Now, on to my very first project to share with you!


This ghost is oh so adorable!  I went for a fairly simple card.  I printed out the ghost on Bristol Smooth cardstock because I knew I wanted to use Zig Clean Color real brush markers to color the image.  I printed it fairly large so the image could be the showcase of my card.  I added Dark Gray along the far left side of the ghost.  I used Pale Gray to blend it out a bit and finished blending with a waterbrush.  For the belt I used Deep Violet.  I added just a touch of color at the edges of the belt and blended with the waterbrush.  For the buckle I used Orange and went over it with a gold wink of stella brush to give it some shimmer.

For the cheeks I added the slightest bit of Carmine Red.  I blended and blotted at the color with a paper towel until it was very pale.  Then I painted the spider with the dark gray and the bow with the same orange.  After everything was dry, I added clear wink of stella to the cheeks and the bow.  I then used a stitched rectangle die from Lawn Fawn to cut the ghost panel.

The purple paper is from one of my (hoarded) Doodlebug paper pads.  This one is from Ghouls & Goodies.  I used the next larger stitched rectangle die from the same set to cut out the purple paper.  I went ahead and adhered the purple and ghost layer together.

I went back yet again for the NEXT largest stitched rectangle die.  This black layer is from the same Doodlebug paper pad.  Did I mention I'm addicted to Doodlebug paper and sprinkles??  The orange layer I cut with my paper trimmer because I wanted it to be such a tiny border.  This layer I adhered to a white, top fold card base.  I put a generous amount of foam tape on the back of the purple layer and adhered it in place on top of the black layer.

I still wanted to add more shimmer to the card so I dug around through my stash until I found some lovely orange glitter paper from Lawn Fawn.  I used the Coles ABCs (also Lawn Fawn) to cut out the word "boo".  I glued these down with liquid glue to the ghost layer.  Since you can never have too much sparkle, I added a few drops of Lilac Whisper glitter Nuvo drops.  All done!

Here's a few more pictures just because!

Gorgeous glitter paper!


I think she turned out super adorable but I might be biased.  Like this cutie?  There are lots more to be found in the 2 Cute Ink Etsy store ----->  2 Cute Ink.  Stay tuned for more 2 Cute Ink cuteness heading your way soon!

Toodles!
~Kristina