Showing posts with label Pretty Pink Posh. Show all posts

Monday, November 14, 2022

Coffee Lovers hop

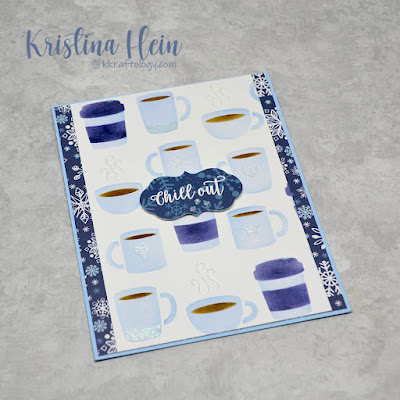
Hi there!!  It's one of my favorite times of the year.  It's the Coffee Lovers Blog hop!  Here's my first card.


If you'd like to play along head HERE for details!


Inks from Stampin Up!, stencil from Pretty Pink Posh, Echo Park My Favorite Winter paper pad and ephemera and Arctic Fox Paper Glaze.

Cheers!!
~Kristina


Tuesday, January 1, 2019

Winter Snowflakes

Hi guys!  Hope you had a great New Year's!  I'm back again on the Dies R Us blog with more winter inspiration.  Can you sense a theme here?  Winter is here to stay for a while.

Come on over to the blog HERE.


Have a grand day!
~Kristina

Tuesday, December 4, 2018

Coffee for You - Dies R Us

I am up on the Dies R Us blog today to share an autumn, coffee themed card.  You can find all of the details on the Dies R Us blog right HERE.

I am also linking this card up to the current Coffee Lovers fall/winter blog hop!


Be sure to link up your coffee/cocoa/tea themed creations before the blog hop ends.  That link up can be found HERE.

#fallwinter2018clh

Have an awesome day!
~Kristina


Saturday, December 1, 2018

Penelope cat gets her coffee

Another one of my favorite times of year has arrived at last.  The Fall/Winter Coffee Lovers blog hop!!!  The chance for me to ink up some of the coffee themed stamp sets I have been shamelessly collecting.  It totally justifies their purchase, right??  Anywho, I'm hoping to complete several cards for this round so wish me luck.


Here is my first card to share!


I used this adorable digital stamp from 2 Cute Ink called Penelope Cat.  You can purchase her right HERE.  I printed her out onto Cryogen White Copic safe cardstock.  I had already pre-picked the main piece of patterned paper I wanted to use so I went through my Copics looking for colors that would match.  Here is the list of colors used.

Cat T1, T3, T5
Cheeks & inner ears R00
Table E71, E74, E77, E79
Coffee E23, E27
Mug & Flowers YG61, YG63, YG67
Scarf RV63, RV66, RV69

Once she was all done I moved on to the rest of the pieces.  I cut her out with a Wonky Rectangle die from MFT Stamps.  I handcut a thin green layer out of a coordinating solid green cardstock from Stampin' Up.  Now, can we talk about this background??  The base aqua coffee patterned paper is from an older paper pad.  It is called Winter Wonderland from Pebbles.  I also pulled the pinkish patterned paper from the same paper pad.  Now came some more fun.  I cut it with a plaid die!  My crafty heart goes a little mushy when I get to use this die.  It is the Diagonal Plaid die from Lil' Inker Designs.  It's awesome.

I glued the coffee print paper to a pink cardbase.  Next came the plaid pinkish paper, the green layer and the cat layer.  For the final touch I added some different sizes of sparkling clear sequins from Pretty Pink Posh.  And that's it.  It's a pretty simple card even with the Copic coloring.  I encourage you to check out the 2 Cute Ink Esty store here.  I also want to encourage you to play along with the Coffee Lovers blog hop.


You can link up your creations HERE.  Be sure to use #fallwinter2018clh!

 Happy Crafting!
~Kristina

Wednesday, November 21, 2018

Thanksgiving

Thanksgiving is almost here!  Yikes.  I can hardly believe it.  That means Christmas is going to sneak up on me so fast!  Deep breath.  I wanted to squeeze in one more fall card before it becomes all Christmas all the time.  Seeing how tomorrow is Thanksgiving, I figured a Thanksgiving themed card was in order.


I started by printing out this little guy onto natural white Neenah cardstock.  I had already picked out the plaid paper to use so I grabbed my copic color chart and started picking markers.  Here are the colors I used:

Mouse: E81, 84 & 87
Ears, Nose & Cheeks: R00.  The ears also have a little bit of E81 to tone down the pink.
Pumpkin: YR12, 15, 18, 27
Stem, swirl & feet pads: BG96, YG63, 67
Yellow flower: Y11, 13, 18 Center: E87, 89
Rust flower: E15, 17, 18 Center: Y13, 15

Once I was all done with coloring I used my Scan n Cut to cut him out with a little border.  I went back to the plaid paper.  This is from Carta Bella's Fall Blessings paper pad.  I pulled out two other patterns that went well with the plaid.  An orange and a green.  I really wanted a non standard die shape for my layers so I went digging through my stash.  I found these beautiful Label 55 dies from Spellbinders.  I cut the green and the orange papers with different sizes of the same die set.  Then I cut the plaid paper with a scalloped rectangle die from Mama Elephant. 

I sponged the edges of the plaid paper with a mossy green.  I decided to cut my label dies so that they would be flat on the bottom and line up with the stitched edge of the plaid paper.  I sponged the edges of the orange paper but left the green one alone. I glued the mouse directly onto the green paper and glued the rest of the layers together.  These were then glued onto a Neenah natural white card base.

I stamped the Happy Thanksgiving sentiment onto another piece of the Neenah paper with the same mossy green ink I used to sponge the plaid paper edges.  I cut it down to a small rectangle and sponged those edges with the orange ink.  I used a piece of foam tape on the back to pop it up from the card.

I thought it needed just a little something more.  I didn't quite like the look of sequins but I did find these gorgeous gold gems from Pretty Pink Posh in my stash.  Just perfect.  And that's it!  I hope you like my little mouse card and that you have a wonderful Thanksgiving.


You can pick up the Pumpkin Mouse digital stamp right HERE in the 2 Cute Ink Etsy store.  Be sure to check out all of the great digital stamps Heidi has in her shop!  Come on over and check out her Facebook group too!  2 Cute Ink Digital Stamp Fans


I'll be back soon!
~Kristina

Wednesday, October 24, 2018

Scarecrow kitty cat

I can't believe how quickly fall is already beginning to fly by.  I want to hold onto this season for as long as I possibly can.  I guess that means I need to keep on making fall themed cards to share so here we go with my next creation!


This scarecrow cat digi stamp is just so very adorable.  You can add him to your collection right HERE.  He's an absolute steal for $2.99!!

A whole lot of love went into this card.  I'm sorry I forgot to take pictures along the way.  I tend to get caught up in the creating and forget to snap photos.  I'm working on it!  The whole project began by playing with alcohol inks and Yupo paper.  I love just sitting and seeing what I can make the colors do with the alcohol inks.  I started by putting a bit of blending solution all over the piece of Yupo.  Then I started adding random dots of Valencia, Rust, Meadow and Oregano.  I like to use a straw to blow the colors around.  Add a little more blending solution, more inks and so on.  If you've ever worked with alcohol inks, you know how this goes.

Once I was pretty happy with my background piece, I mixed a bit of the gold mixative with the blending solution.  I then used a paint brush to splatter some of the gold onto the background.  I set it aside to dry for about 10 minutes.  I grabbed a scrap piece of gold foil leftover from a previous foiling project.  I layed it down on different sections of the background and rubbed it with my fingers.  When you pull it back up bits of the gold stay behind on the semi sticky portions of the ink.  Can you say instant bling?  After it was totally dry, I die cut it with a beautiful die from Papertrey Ink.  Love it!

Now onto coloring this little guy.  I knew what size he needed to be to fit into the open rectangle so I sized him down and printed him out onto Copic safe paper.  I then proceeded to make a huge mess on my desk by pulling out lots of Copic markers.  Here's what I used:

Cat body/ears/feet: W3, W5, W7
Inner ears & cheeks: R20 which I went over with a W1 to tone it down
Outfit & hat patch: B95, B97, B99
Kerchief: YG93, YG95, YG97
Hat: E35, E37, E39, E59
Pumpkins: YR15, YR68, YR27 Stem: YG93, YG95
Grass: E31, E35, E37, E39, YG93, YG95, YG97

I used a white, gelly roll pen to add a details to the eyes, cheeks, patch, kerchief and pumpkin.  I cut the kitty piece down to just a little bit larger than the rectangle opening so I could glue it to the backside of the die cut piece.  I dug through my paper stash to see what would work as a background for the inked piece.  I found this linen look piece in Echo Park's Celebrate Autumn 6x6 paper pad.  I glued the die and the paper together.  I then trimmed it down to fit an A2 sized card base and glued it on.


For my finishing touches I added some metallic gold confetti sequins from Pretty Pink Posh.  Voila!    Remember, there are tons more great digital stamps to be found in the 2 Cute Ink Etsy store right HERE!


Have a fabulous day!
~Kristina

Wednesday, August 22, 2018

Dies and Distress Oxide

Hello one and all!  I recently signed up for the Spellbinders die club of the month.  I have seen lots of beautiful examples from past months online and this was the month I finally signed up!  I have had the dies laying on my desk just waiting for me to play with them.  We won't talk about how large my new supply stack is...or the fact that I should be getting my Lawn Fawn pre-ordered goodies any day.  Sigh.  Not enough time for my crafting.  Back to it.

I had absolutely no plan in mind when I started this card.  I had a purple Distress Oxide ink combo I wanted to use and the die.  I cut the die out of Bristol paper so I could make the oxide inks blend like butter.  I literally just kept playing around and building a card as I went!  I'll show you the picture and then give a few details.


And a closer card shot.


I cut the die from Bristol paper.  Then I blended Shaded Lilac, Wilted Violet and Dusty Concord oxide inks on until I was happy with the blend.  I sprinkled it lightly with water and blotted dry.  Then I sprayed with a shimmer mist and blotted again.  I set the die cut piece aside to dry.

For the backrgound I used a Tim Holtz/Stampers Anonymous mini stencil.  I don't have the name for this one but I think it came in a multi pack from last winter's release.  I used Pumice Stone in regular distress ink to sponge on the design.  I cut the edge of the panel with a die from MFT Stamps.  I adhered this panel with foam tape to a Sahara Sand (Stampin up!) card base.

I adhered the die cut piece directly to the stenciled piece.  I used the oval die that came with the large die to cut out a white piece.  I used the Thanks sentiment from an Altenew set called Enchanted Iris.  The ink is Sahara Sand.  I did sponge the edges of the oval a bit before using foam tape to adhere it to the die cut piece.

I then added sparkling clear sequins from Pretty Pink Posh.  For the final extra detail, I added a little dot of Mercury Glass Stickles to every other scallop.  Done!

I love how this came together even though I didn't have a plan.

Hope you have a great day!
~Kristina


Friday, August 17, 2018

Hooray for Friday!

Right now I'm doing the happy dance.  It's Friday.  At last!  I can't wait for a little family time, a little crafting time and a little down time.  Hope you get to do something fun this weekend.  My idea of a good Friday night is playing in my craft room.  Yep.  Total introvert here.

Moving on!  I recently purchased some new to me products from Shimmerz Paints.  Today I am using one of the original product lines they released...Shimmerz!  Guys, these are GORGEOUS!  They are a liquid paint with a TON of shimmer.  Like, seriously!  I snagged one of their newest colors, Wisteria Lane, because I just love all things purple.  Here is the description of the color from their website.

"Wisteria Lane is a part of Shimmerz Paints new Fall 2018 color release. Wisteria Lane is a dusty cool lilac hue with silver shimmer added in. Wisteria Lane is available in a 1 oz jar and all our products are hand crafted by order."

I wasn't entirely sure what I wanted to make but I wanted to give it a test drive.


I'm not sure I caputured the beautiful shimmer of this product but I am totally in love.  I *need* more colors.

This is how I created this cute square card:

I started with a piece of Canson watercolor paper.  I stamped one of the flower images from the Altenew Floral Shadow stamp set with Inkon3 embossing ink.  I sprinkled on clear embossing powder and melted it.  After it cooled, I stirred up the Shimmerz paint and started applying it to the watercolor paper.  I did add a little bit of water to get slight variations in the color but you could totally do it straight out of the jar.  So, SO pretty!  I let it dry for a bit.  I went back with a damp paper towel and carefully wiped off the excess paint from the embossed areas.

I cut out the watercolor paper with a square die called Inside Scalloped Squares from Craftin Desert Divas.  I glued the center piece in place.  I added foam tape to the scalloped border and adhered it to the base as well.  The sentiment is from the same Altenew set and is heat embossed in black on gray cardstock.  I went over it with a Wink of Stella glitter marker.  I popped it up with foam tape as well.  For the final touch, I added a few Sparkling Clear confetti sequins from Pretty Pink Posh.

Excuse me while I drool over the shimmer!!

See you soon...
~Kristina

Sunday, May 27, 2018

Coffee Lovers take two!

Hidey ho crafty friends!  I am back with a second card for the Coffee Lovers blog hop!  Remember, you can find full details and the link up right HERE.

Today's post is another quickie!  So let's start with a picture of my completed card!


For this card I started with a piece of watercolor paper.  I embossed the coffee image with white embossing powder.  This cup is from the Altenew Coffee with a Splash set.  I've been trying to find a way to use this set and this was the perfect chance.  I then blended on three different colors of distress ink for an ombre look.  I used Antique Linen, Vintage Photo and Ground Espresso.  I splattered on clean water, let it sit for a few moments and then blotted it up with a paper towel.

Once it was dry I added the sentiment from The Ton's Caffiene Crush set.  I used Versafine black ink and clear embossing powder.  I used my corner chomper to round two of the corners.  I added craft foam to the back and glued it to a white card base.  For the final little bit of shine, I added Ivory crystals from Pretty Pink Posh.  Ta da!

I am hopeful that I can get at least one more card made before the challenge is over.  Thanks for popping in!

~Kristina

Saturday, April 28, 2018

Tiddly Inks blog hop

I got an email the other day from Tiddly Inks announcing that they would be having a blog hop that anyone could participate in.  I have several of their digital stamps in my collection so I figured why not play along??

The image I am using is called Mama's Fuchsias.  Christy has a TON of gorgeous digital and clear stamps in her store.  If you aren't familiar with Tiddly Inks, I suggest you check out the store!


I printed the stamp out onto Bristol smooth paper.  I grabbed several colors of Zig Clean Color real brush markers, a waterbrush and got to coloring.  No extra fancy coloring here.  I layed down a little color and spread it out with the waterbrush.  If I felt I had too much color I would wipe my brush on a paper towel.  After the first layer was dry I did go back and add a little more color for a bit of shading.  Once the main image was dry, I went around all of the edges with the English Lavender Zig marker and spread out the color as far as I could.  I think it helps to pop the image off the page!

I set it aside and got to working on my background.  I have been slowly building up my collection of  Alcohol inks.  I just love to sit down and play around to see what I can get!  I chose three colors that coordinated with my colored flowers.  Raspberry, Amethyst and Botanical.  I just kept adding color and blending solution.  Used a straw to blow the colors around a bit.  Stared at it some more.  Added more color.  And so on until I was happy with the results.  Once it was pretty dry I laid a piece of gold foil on top and rubbed over it.  Pull it back slowly to see the little veins of gold!  


Isn't it gorgeous??!!    I almost hated to cut into it but it was too big for an A2 card.  I cut it with a die from Pretty Pink Posh and attached it to the card base.    The flowers I cut out with a die from Spellbinders and mounted it to the background with a layer of craft foam.  For the final bit, I heat embossed the sentiment in gold onto a scrap of black cardstock and glued it in place.  I did go over the sentiment with Wink of Stella to give it a little bit of sparkle!  Here is the finished card!


I can't wait to see what everyone creates!

~Kristina


Wednesday, July 5, 2017

Balloon coloring

Hiya my crafting friends!  I'm back today to share a card that I made out of a practice piece I colored in Mindy Baxter's Copic Create with Markers Mega class.  Check it out here.  I have been having a great time with the class.  I had to take a short break due to a family vacation but I plan to be back at it again shortly.  I think I'm down to the last couple of sections (trees, grass, etc.).  Then I hope to take her Creating with Backrgrounds class!  I love learning more and more about using my Copic markers. I am always looking to improve my skills.  I highly recommend you check her classes out. She even has a free class to try out!

The section I just completed was on coloring transparent items.  In particular, balloons.  In the past I have just colored balloons that overlapped as a solid color with no transparency.  NO MORE!  Check out my results...


I am amazed at how simple she makes it seem!  I was able to follow her instructions to achieve beautiful results the very first time I colored the image.  I just love how it turned out.  I can see myself coloring a lot more balloons in my future.

The gray layer is Going Gray cardstock from Stampin Up.  The blue layer is Pacific Point also from Stampin Up.  I used the Roses all over background stamp from MFT Stamps and embossed it with white embossing powder.  The aqua layer is Cool Caribbean from Stampin Up.  The balloon layer was cut using a die from the Fancy Frames set from Craftin Desert Divas.  I did add a little glossy accents for a little extra highlight.  The sequins are from my stash (most likely from Pretty Pink Posh). The birthday die and stamp are from Lawn Fawn.

I appreciate you stopping by!  Remember to check out Mindy's full line of classes here.

Toodles!
~Kristina

Saturday, June 24, 2017

Summer Coffee Lovers Blog hop

Hiya everyone!  I am so excited that the next Coffee Lovers Blog hop has arrived.  I've got a busy scheduled coming up this week so I knew I needed to make something today.  I realized I had several images that I had colored for the spring hop but never had the time to make them into cards. This was just the perfect opportunity!  Without further ado, here are my entries!


For this card I used the gorgeous Spring to Go stamp from Unity Stamps.  I need to collect all of their coffee cup stamps.  I really want the one with the cat on it!  I tried to be very light handed when I colored the image in using Zig Clean Color markers and a water brush.  The patterned papers are both from Doodlebug.


This is a digital stamp from Jessica Lynn Original stamp company.  This was actually a freebie that I fell in love with from the Spring blog hop.  In fact, I loved it so much, I colored it up three times.  For this version I used Albrect Durer watercolor pencils.  The stitched frame is from Mama Elephant and the sequins are from my stash.  They might be from Pretty Pink Posh.  The sentiment is from Altenew's Coffee Talk set.


Take number two on the Jessica Lynn Original digital stamp.  This one I colored up using Mission Gold watercolors.  It was my first time using them and it's not perfect but I love it anyways!  The sentiment is from Altenew's Coffee Love set.  I also created the background using other stamps from the same Altenew set.


Third and final take on the Jessica Lynn Original stamp. I'm not going to lie.  This version is my favorite!  I colored it with Zig Clean Color markers.  This one is considerably more bold than the image I colored from Unity Stamps.  I couldn't find anything in my paper stash to match the vibrant colors.  I dug out some matching colors of distress inks and painted some stripes on watercolor paper. Splattered it with water to give it texture and presto!  Did I mention I love this card?  This sentiment is also from Altenew's Coffee Love.  It's hard to see but I cut the stripe layer out using a Wonky stitched rectangle from MFT Stamps.  The stiched scalloped edge is from Pretty Pink Posh if I am remembering correctly.

Whew!   A lot of pictures in this post and you can tell I had lots of fun making them.  Thanks for stopping by!

~Kristina

Wednesday, September 28, 2016

Mocha Me Happy!

Hi again!  I thought I was done making cards for the Fall Coffee Lovers Bloghop...But then I was out at Starbucks getting my favorite drink (Iced Salted Caramel White Chocolate Mocha...yum!) when inspiration hit!


You know how Starbucks has lots of giftcards out at the registers?  And that they seem to be coming out with all kinds for every season/holiday?  Well, this is what caught my eye.

It was literally screaming to be made into a card!  So I asked if I could have one without putting money on it and they kindly said yes!  I tucked this fantastic bit of inspiration into my purse.

I finally got a chance to sit down at my craft desk last night and then minor drama.  Where are all my gosh darn leaf sets?  Fall is my FAVORITE season!  Why don't I have any??  Apparently I know I love fall and everytime I see an awesome leaf set I don't buy it because I'm thinking I have ten at home already.  Well, I'm going to have to buy some.  I did just get an order in that had the MFT Stamps Geometric Greenery set in it.  So, I pulled it out and decided to just go with it.


I'm fairly certain the photo doesn't do the copper embossing powder justice.  All the images except for the sentiment were embossed with copper.  The sentiment was done in gold.  I dug out my Peerless watercolors to do the background and everything else was done with distress inks.  I let it dry overnight and got back at it this evening.  I attached it to this beautiful cardstock I found in my stash.  I believe it is Stampin up but it is a retired In Color from several years ago.  It was just perfect. Then I searched through my sequins.  None of them seemed just right.  So I tried the clear droplets from Pretty Pink Posh.  Voila!  They were just the thing!

Some days you just never know where you'll find inspiration!  Have a fantastic day!
~Kristina